How to stop Recurring Invoices in QuickBooks Desktop
Recurring transactions in QuickBooks are set to run on a custom interval that you define. If you’re not using a recurring payments platform that integrates with QuickBooks, it might be a bit difficult to navigate around the interface to figure out where some of the settings exist.
Recurring payments in QuickBooks Desktop are handled in the Manage Recurring Payments page. Head over to that page to view all of the active recurring payments you have.
Here’s how to stop a recurring invoice in QuickBooks Desktop:
1. Find the Status Column on the far right
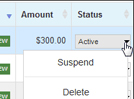
2. Click the dropdown to reveal actions you can take
3. Click “Delete”
Whether you’re charging a flat fee or a percentage for your late fees, or both, you can automate any of these options in your RECUR360 account and sync it with QuickBooks.
This will delete the recurring payment, and no more payments will be processed. You cannot view the individual past payments related to it. If you’d like to view those, you’ll have to go to the transaction history and search by customer.
How do I suspend a payment?
An alternative to deleting the recurring payment is suspending the payment for a certain period of time. You can do so by clicking the dropdown in the status dropdown and selecting “Suspend”. Once you’re ready to make this recurring payment active again, you’ll need to come back to this page and click “Resume”.